So, I was surfing You Tube the other day. I like to surf on You Tube because it has some interesting stuff on it. I especially like to peruse any photography stuff for tips and tricks etc. Anyway, I came across this video that mentioned Photoshop Beta and a new Neural Filter is has called Photo Restoration.
To start with, you have to download the Photoshop Beta software. Click on Filters-Neural Filters. You will see the list of Neural Filters with a download cloud next to it. Individual Neural Filters have to be downloaded.
Photo Restoration comes with a Restoration slider which improves on colour, contrast and details, a scratch reduction tick box option with slider and, a tick box option to enhance face.
Adobe describes the Photo Restoration as an AI (I am assuming Artificial Intelligence) trained model to help restore old or damaged photos. Another review I read about the Enhance Face option is that the software identifies all facial features and basically builds a new face from those features. Whether it can restore facial features depends on the condition of the original photo. Some come out looking really good and others come out resembling a really bad botox job. All in all I think it does a pretty good job.
There is also a Colourise filter (from Black and White) which does a pretty good job but in some of the photos I have put up here, you can see a Dis-Colourisation actually takes place and skin tones come out looking a grey type colour. I love black and white photos and never thought I would be interested in colourising old photos but....... The colour really brings them to life.
Thing is, with all of these filters, it reopens in the main Photoshop window for any further action you desire.
Note that the current version of Photoshop does have Neural Filters available (you still have to download the individual filters though). It does not however, have the Photo Restoration option which is what I was interested in the most.
Copyright © Life with Jordy Photography
All Rights Reserved
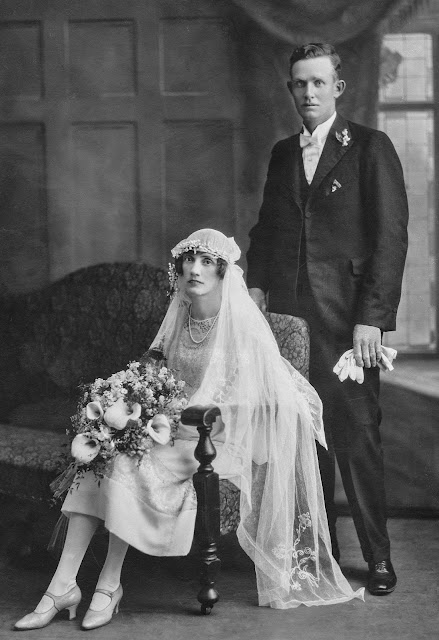%20on%20their%20wedding%20day%2030th%20of%20October%201926_edited-1.jpg) |
Before and After. The Enhance Face feature came out very harsh on my Grandfathers face. Perhaps Adobe could include an effect or opacity slider for the Enhance Face filter. I softened it as best I could and also cut back on the shadows that surrounded his eyes. The Colourisation in this photo is pretty good I think. |
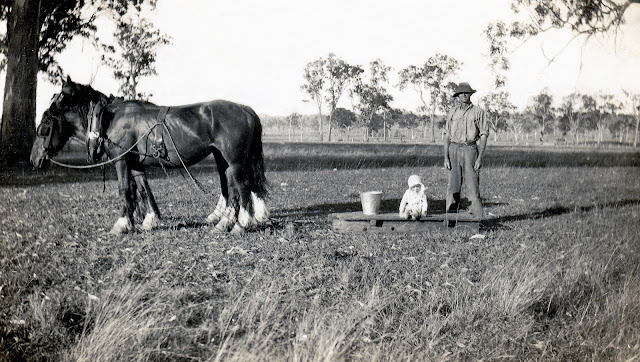%20on%20the%20sled%20with%20Pa%20(Edward%20Yore)%20at%20Cryna.jpg) |
I didn't use the Enhance Face filter on this photo because the software didn't pick up the faces.
The software will indicate if the face is too blurred or damaged to restore the face but,
in this case I think part of the faces are hidden by baby bonnet and work hat. Note the colour
of my Grandfathers arms and just below his neck in the coloured photo. The colourisation
has not done a great job here although, I recall my grandfathers arms as being brown
and leathery from constant work in the Sun on the farm. This would be a small change in
the main Photoshop window after exiting the Neural Filter screen. Apart from that, the
colours don't look too bad. I don't expect the colours to be perfect for an old photo because then
it would not have that 'old photo' look. |
 |
My Great Uncle Joe - taken before he embarked to France in
WW1. I restored the top photo removing all types of scratches
and a large chunk on the side that was totally missing. The Photo
below has been restored again using the Enhance Face filter. Even
though the first photo is not bad at all, you can see the
sharpening and tonal difference on the second from the filter. |
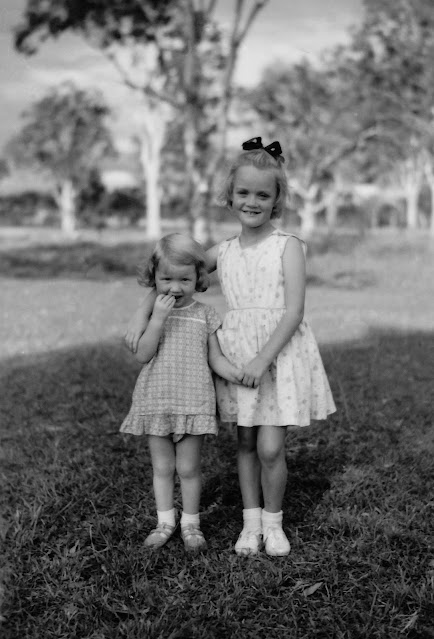 |
Original photo on the top. The original is nice and sharp for an
old 1952 Voigtlander Folding Camera. The Enhance Face filter has
picked up on elder sisters face but not on the younger sisters face.
Perhaps because the younger sister has her hand in her mouth and
the software did not recognise the face. The colourisation is
spot on except for a slight purple colour on the younger sisters left
shoulder and also on the older sisters hair. I am thinking that
Adobe could also include the option of manually selecting a face
as well as the automatic recognition. |
 |
The top photo here is one I had restored, removing all of
the scratches and a bend mark across the top. The photo
below has been restored using the Enhance Face filter.
This photo is my favourite of the Enhance Face filter
restorations. It has sharpened up the faces wonderfully
with no harsh shadow or eyes as some of the others have done. |
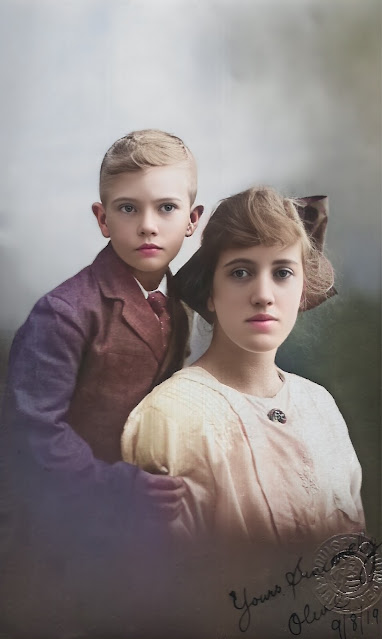 |
And here is the colourised version. See how my Great
Uncles sleeve is not the same colour. I am not sure why
it would be a different colour. At first I thought it may
have been something to do with the shading of the
original photo but, on looking at the original, the shade and
tone is the same.
|
 |
The photo above is the original with just a slight restore job. Below
is the Neural Filter Photo Restoration using the Enhance Face and
then colourised. The colourisation looks lovely with the hay showing
it's real colour. |
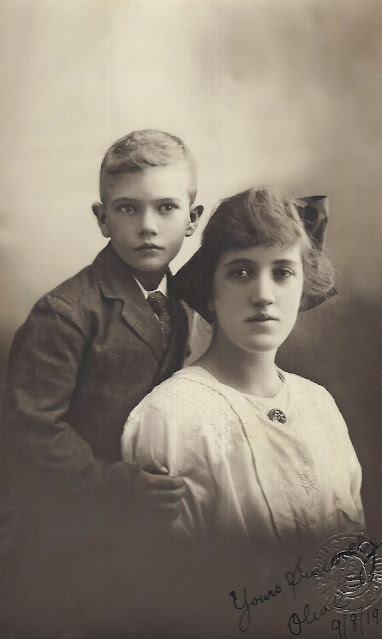
Mary,%20Joe,%20Josephine%20Maria%20Yore%20-%20nee%20Morris%20(standing,%20middle),%20Bill%20and%20Olive%20-%20Mum%20said%20that%20Catherine,%20another%20sister%20died%20at%20age%2021.jpg) |
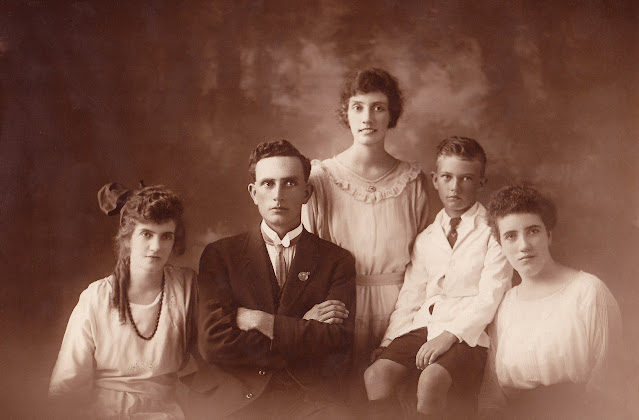
Above is the original photo which was in remarkable condition given that it was over 100 years
old! The photo below has been restored using Photo Restoration with Enhance Face filter and then colourised. My Great Uncles face in the restoration had harsh shadows and very dark around the eyes initially but I was able to soften that up once in the main screen of Photoshop after the restoration filters were applied. The face of the younger male came out very reddish looking but I was able to edit that in
the main screen also to bring it back to an acceptable skin tone. Totally surprised for the
colourisation that the background came out blue but I think it looks great! |
Mary,%20Joe,%20Josephine%20Maria%20Yore%20-%20nee%20Morris%20(standing,%20middle),%20Bill%20and%20Olive%20-%20Mum%20said%20that%20Catherine,%20another%20sister%20died%20at%20age%2021%20-%20restored%20and%20colourised%20copy.jpg)
%20on%20the%20wedding%20day%20at%20St%20Marys%20Church,%20Beaudesert.%20%2018th%20September%201954%20copy.jpg) |
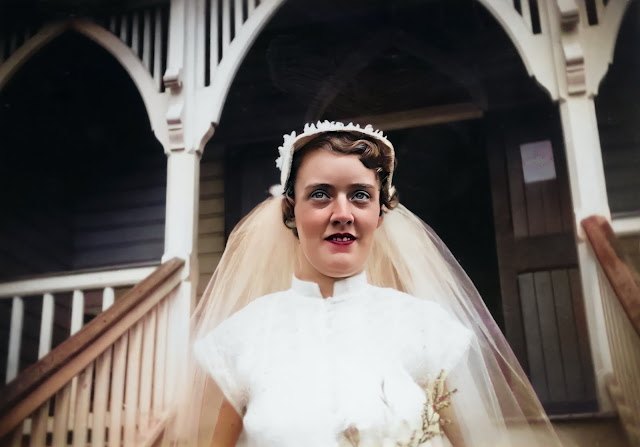
I am not sure if I like this photo or not after restoration. When viewed as a smaller photo it looks very nice but when enlarged, The Enhance Face filter seems to have really 'overworked' my mothers face;
like an influencer from Instagram, it doesn't seem real. This is where I think that Adobe could have an effect or opacity slider for the Enhance Face filter so that the results are not so harsh perhaps? |
%20on%20their%20wedding%20day%2030th%20of%20October%201926_edited-1.jpg)
%20on%20their%20wedding%20day%2030th%20of%20October%201926%20-%20restored%20and%20colourised.jpg)
%20on%20the%20sled%20with%20Pa%20(Edward%20Yore)%20at%20Cryna.jpg)
%20on%20the%20sled%20with%20Pa%20(Edward%20Yore)%20at%20Cryna%20copy.jpg)


Mary,%20Joe,%20Josephine%20Maria%20Yore%20-%20nee%20Morris%20(standing,%20middle),%20Bill%20and%20Olive%20-%20Mum%20said%20that%20Catherine,%20another%20sister%20died%20at%20age%2021.jpg)
Mary,%20Joe,%20Josephine%20Maria%20Yore%20-%20nee%20Morris%20(standing,%20middle),%20Bill%20and%20Olive%20-%20Mum%20said%20that%20Catherine,%20another%20sister%20died%20at%20age%2021%20-%20restored%20and%20colourised%20copy.jpg)
%20on%20the%20wedding%20day%20at%20St%20Marys%20Church,%20Beaudesert.%20%2018th%20September%201954%20copy.jpg)


Comments
Post a Comment